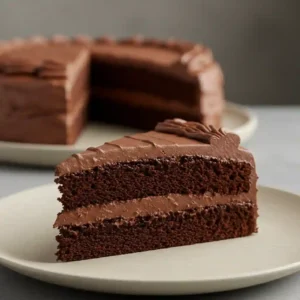
gluten free chocolate cake
This easy, one-bowl gluten-free chocolate cake is perfect for any celebration. It’s incredibly moist and fluffy, with a rich chocolate flavor that will impress everyone.
Ingredients
Dry Ingredients
- 2 ⅔ cups 380g Gluten-Free All-Purpose Baking Flour, sifted
- 1 cup 85g unsweetened cocoa powder, sifted
- 1 ½ teaspoon baking powder
- 1 teaspoon baking soda
- ½ teaspoon salt
Wet Ingredients
- 1 cup 240ml milk (dairy or non-dairy)
- 1 cup 200g granulated white sugar
- ¾ cup 165g light brown sugar, packed
- 3 large eggs at room temperature
- 1 teaspoon vinegar white or apple cider
- 1 tablespoon vanilla extract
- ⅔ cup 160ml neutral oil (canola, refined avocado, etc.)
- 1 cup 240ml hot brewed coffee or boiling water
For the Chocolate Buttercream
- ¾ cup 170g butter, softened (1 1/2 sticks)
- ½ cup 42g unsweetened cocoa powder, sifted
- 3-5 cups 360-600g powdered sugar, sifted
- 2-4 tablespoons 30-60ml milk (dairy or non-dairy)
- 2 teaspoons vanilla extract
Instructions
- Prepare for Baking First, position a rack in the center of your oven and preheat it to 350°F (180°C). Proper preheating is key for an even bake. Next, prepare your pan of choice, either one 9x13 inch pan or two 8-inch round pans. Generously spray the bottom of the pan(s) with oil, then line the bottom with a round of parchment paper. This simple step is my secret weapon; it guarantees the cakes will release flawlessly later on. Set your prepared pans aside.
- Combine the Wet Base In a large mixing bowl, whisk together the milk, white sugar, light brown sugar, eggs, vinegar, and vanilla extract. Continue whisking for about a minute until the mixture is smooth, pale, and well combined. We will add the hot coffee in the final step, as its heat is needed to activate the cocoa powder.
- Incorporate the Dry Ingredients Add all your sifted dry ingredients (flour, cocoa powder, baking powder, baking soda, and salt) directly into the wet mixture. Whisk gently until everything is just combined. A few small lumps in the batter are perfectly fine. It is important not to over-mix at this stage, as that can develop the starches in the flour and lead to a tough cake.
- Activate with Hot Liquid Now, carefully pour the hot coffee or boiling water into the bowl. Whisk slowly and steadily until the batter is completely smooth and glossy. You will notice the batter is quite thin; this is exactly what you want! It is the secret to a super moist cake. Immediately pour the batter into your prepared pan(s). For a perfectly even layer cake, I recommend using a kitchen scale to divide the batter equally between the two pans.
- Bake to Perfection Place the cake(s) on the center rack of your preheated oven. Bake a 9x13 sheet cake for 35 to 45 minutes or two 8-inch layers for 32 to 37 minutes. The cake is done when a toothpick inserted into the center comes out with a few moist crumbs attached. A completely clean toothpick can mean the cake is slightly overbaked.
- Cool Completely Allow the cake(s) to cool in their pans on a wire rack for about 15 minutes. This initial cooling period helps the cake set and prevents it from breaking. Afterwards, carefully invert the pan(s) to release the cake onto the rack, peel off the parchment paper, and flip them back upright to finish cooling. It is absolutely crucial that the cakes are at room temperature before you begin frosting, as a warm cake will melt your beautiful buttercream instantly.
- Whip the Chocolate Buttercream While the cakes cool, prepare the frosting. In a large bowl with a handheld mixer or in a stand mixer, beat the softened butter on medium-high speed for 2 to 3 minutes until it becomes light, pale, and fluffy. This step incorporates air for a super creamy texture. Add the sifted cocoa powder and mix on low until combined. Next, add the sifted powdered sugar one cup at a time, mixing on low speed after each addition. Once all the sugar is in, add the vanilla and 2 tablespoons of milk. Increase the speed to medium-high and beat for another 2 to 3 minutes until the frosting is silky smooth. If it seems too thick, add more milk, one tablespoon at a time, until you reach a perfect, spreadable consistency.
- Assemble and Enjoy Once the cakes are completely cool, frost them with your homemade chocolate buttercream. Add sprinkles if you wish, slice, and enjoy the best gluten-free chocolate cake you have ever made.
Notes
Nutrition Facts (per serving)
- Calories: 395kcal
- Carbohydrates: 52g
- Protein: 5g
- Fat: 21g
- Saturated Fat: 4g
- Polyunsaturated Fat: 4g
- Monounsaturated Fat: 11g
- Trans Fat: 0.1g
- Cholesterol: 54mg
- Sodium: 262mg
- Potassium: 177mg
- Fiber: 4g
- Sugar: 26g
- Vitamin A: 194IU
- Vitamin C: 0.2mg
- Calcium: 40mg
- Iron: 1mg