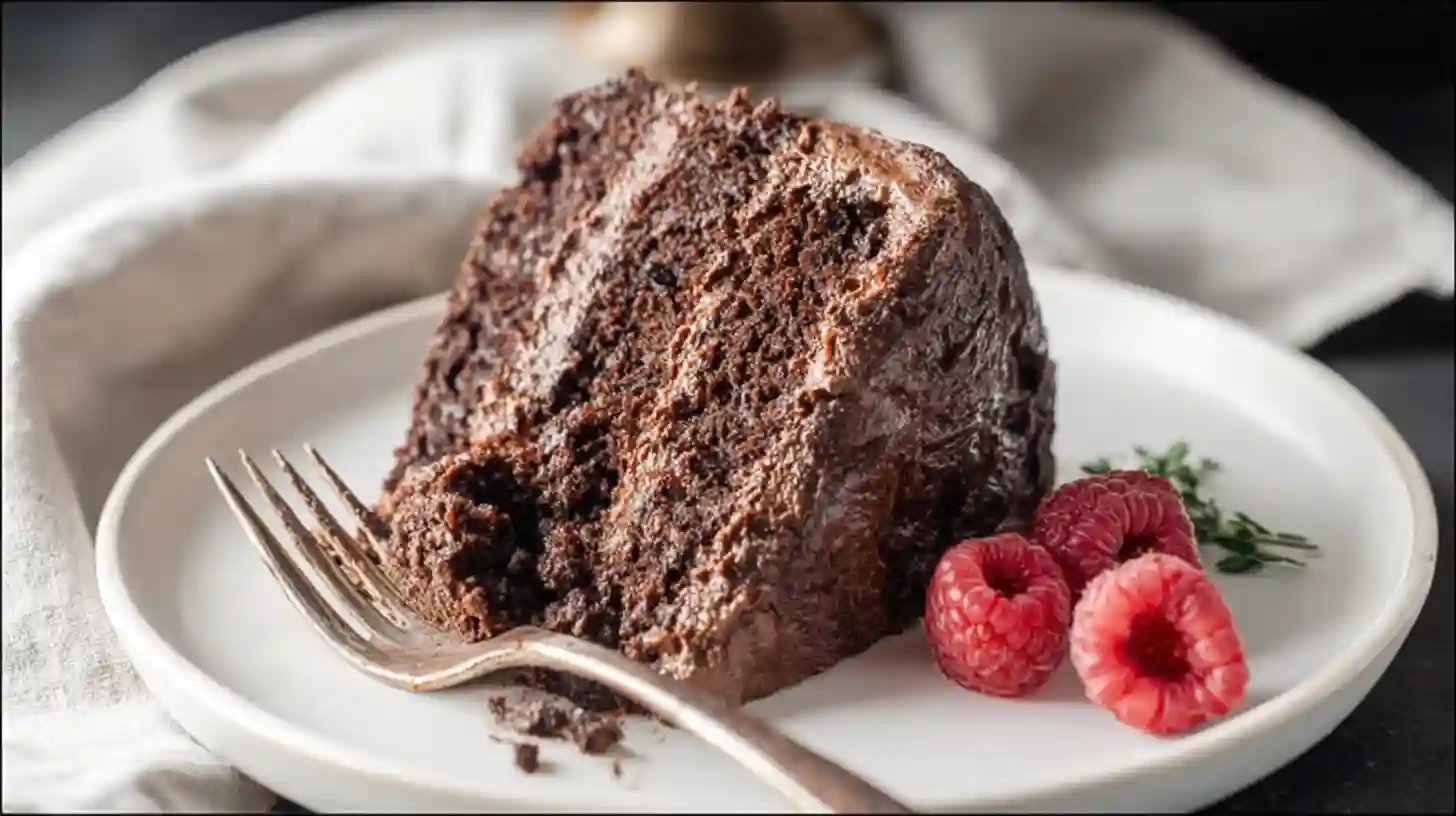
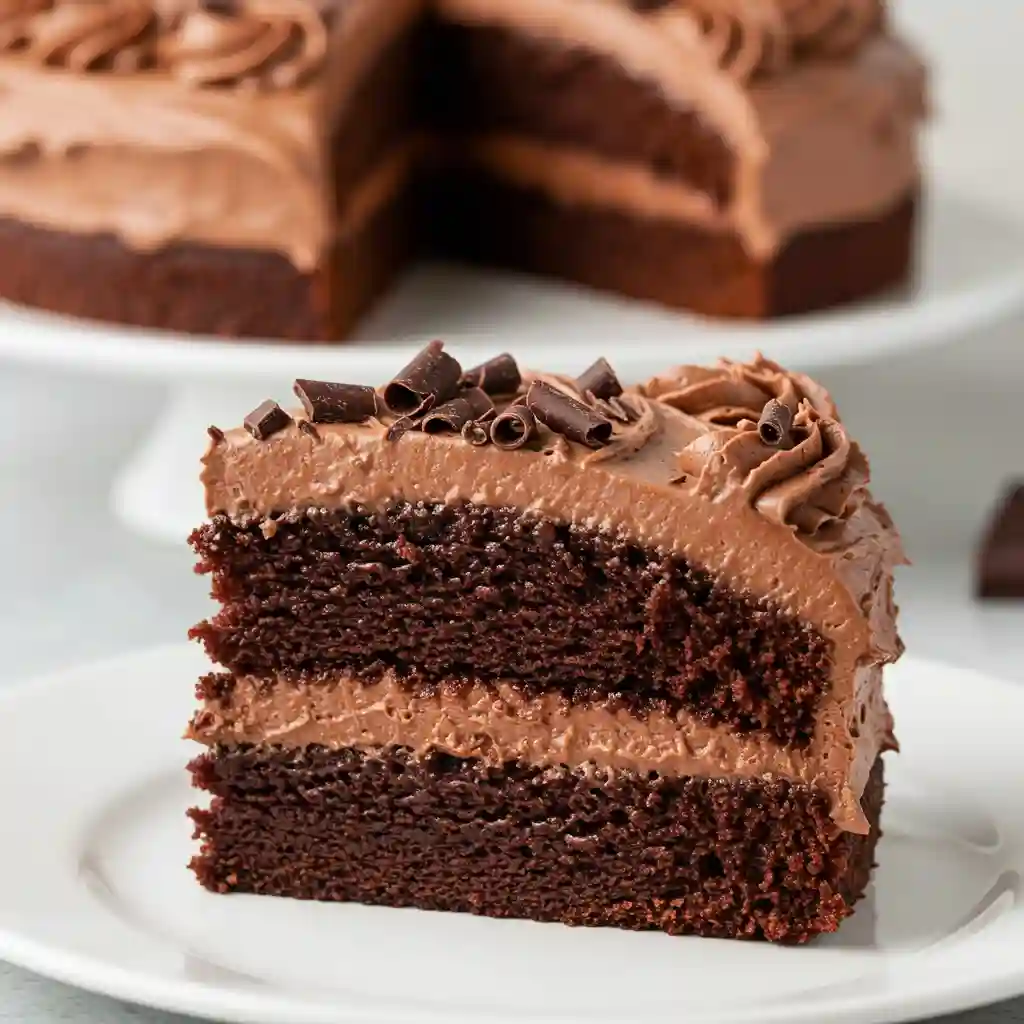
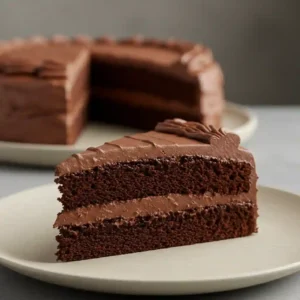
Here is the best gluten free chocolate cake recipe I have spent years perfecting. I’ll never forget the disappointment of bringing what I thought was a beautiful cake to a friend’s birthday, only to watch everyone politely push the dry, crumbly slices around their plates. That moment started my mission to create a truly great recipe. This is the result: an incredibly rich, undetectably gluten-free cake that is consistently soft, fluffy, and so easy to make in just one bowl.
Why This Recipe Works: The Science of a Perfect Gluten Free Chocolate Cake
This cake stands out because every ingredient is chosen with a specific purpose, working together to create a flawless result. Understanding the science behind these choices guarantees your success.
The Secret to Moisture
The key to this cake’s lasting moisture lies in a powerful combination of fats. A neutral oil keeps the cake exceptionally tender and moist without weighing it down. To complement this, sour cream or buttermilk adds another layer of moisture and a subtle tang, which creates a rich, balanced flavor and an incredibly soft texture. This duo ensures the cake stays perfectly soft and delicious, never dry, even after a few days in the refrigerator.
The Ultimate Chocolate Flavor
To achieve a deep, bakery-quality chocolate flavor, this recipe uses two key techniques. First, it calls for Dutch-processed cocoa powder, which provides a richer, darker, and more complex chocolate taste than natural cocoa. Second, using hot brewed coffee or boiling water is an essential step. The hot liquid helps to “bloom” or activate the cocoa powder, a process which deepens the chocolate flavor and ensures a smooth, luxurious batter.
The Perfect “Fudgy” Crumb
Achieving the perfect fudgy crumb is all about structure and richness. This recipe calls for three whole eggs, which are critical for several reasons. They act as a powerful binder, holding the ingredients together and preventing the gluten-free crumb from falling apart. The eggs also contribute essential richness to the batter and help the cake rise, creating a perfect texture that is substantial and fudgy but never dense or heavy.
Ingredients Needed for Gluten Free Chocolate Cake

A truly great cake starts with the right ingredients. Each component in this recipe is chosen to build the perfect texture and a deep, satisfying flavor.
- Gluten-Free Flour Blend: The foundation of this cake is a high-quality gluten-free all-purpose flour. For the best, most consistent results, use a “1-to-1” or “measure-for-measure” blend that already contains xanthan gum. Brands like Bob’s Red Mill 1:1 Baking Flour are excellent choices that provide reliable structure and a tender crumb.
- Unsweetened Cocoa Powder: This is where all the rich chocolate flavor comes from. While natural cocoa powder works, using a Dutch-processed cocoa will give the cake a deeper, darker color and a more complex, less acidic flavor.
- Fats (Oil & Milk): A neutral-flavored oil, like avocado or canola, is essential for a moist and tender cake that doesn’t dry out. The milk adds further moisture and richness to the batter.
- Liquid (Hot Coffee or Water): Using hot liquid is a critical step. The heat helps to “bloom” the cocoa powder, which activates and deepens its flavor potential, resulting in an intensely rich chocolate taste. Coffee in particular enhances the chocolate notes beautifully.
- Eggs, Sugar, and Leaveners: Three large eggs provide the cake with structure, richness, and lift. A mix of white and brown sugar provides sweetness and a hint of molasses for flavor depth. Baking powder and baking soda work together to make the cake rise perfectly.
Dry Ingredients
- 2 ⅔ cups (380g) Gluten-Free All-Purpose Baking Flour, sifted
- 1 cup (85g) unsweetened cocoa powder, sifted
- 1 ½ teaspoon baking powder
- 1 teaspoon baking soda
- ½ teaspoon salt
Wet Ingredients
- 1 cup (240ml) milk (dairy or non-dairy)
- 1 cup (200g) granulated white sugar
- ¾ cup (165g) light brown sugar, packed
- 3 large eggs, at room temperature
- 1 teaspoon vinegar (white or apple cider)
- 1 tablespoon vanilla extract
- ⅔ cup (160ml) neutral oil (canola, refined avocado, etc.)
- 1 cup (240ml) hot brewed coffee or boiling water
For the Chocolate Buttercream
- ¾ cup (170g) butter, softened (1 1/2 sticks)
- ½ cup (42g) unsweetened cocoa powder, sifted
- 3-5 cups (360-600g) powdered sugar, sifted
- 2-4 tablespoons (30-60ml) milk (dairy or non-dairy)
- 2 teaspoons vanilla extract
How to Make Gluten Free Chocolate Cake
This recipe is incredibly straightforward. Follow these detailed steps, and I promise you will have a perfect, moist chocolate cake to share.
- Prepare for Baking First, position a rack in the center of your oven and preheat it to 350°F (180°C). Proper preheating is key for an even bake. Next, prepare your pan of choice, either one 9×13 inch pan or two 8-inch round pans. Generously spray the bottom of the pan(s) with oil, then line the bottom with a round of parchment paper. This simple step is my secret weapon; it guarantees the cakes will release flawlessly later on. Set your prepared pans aside.
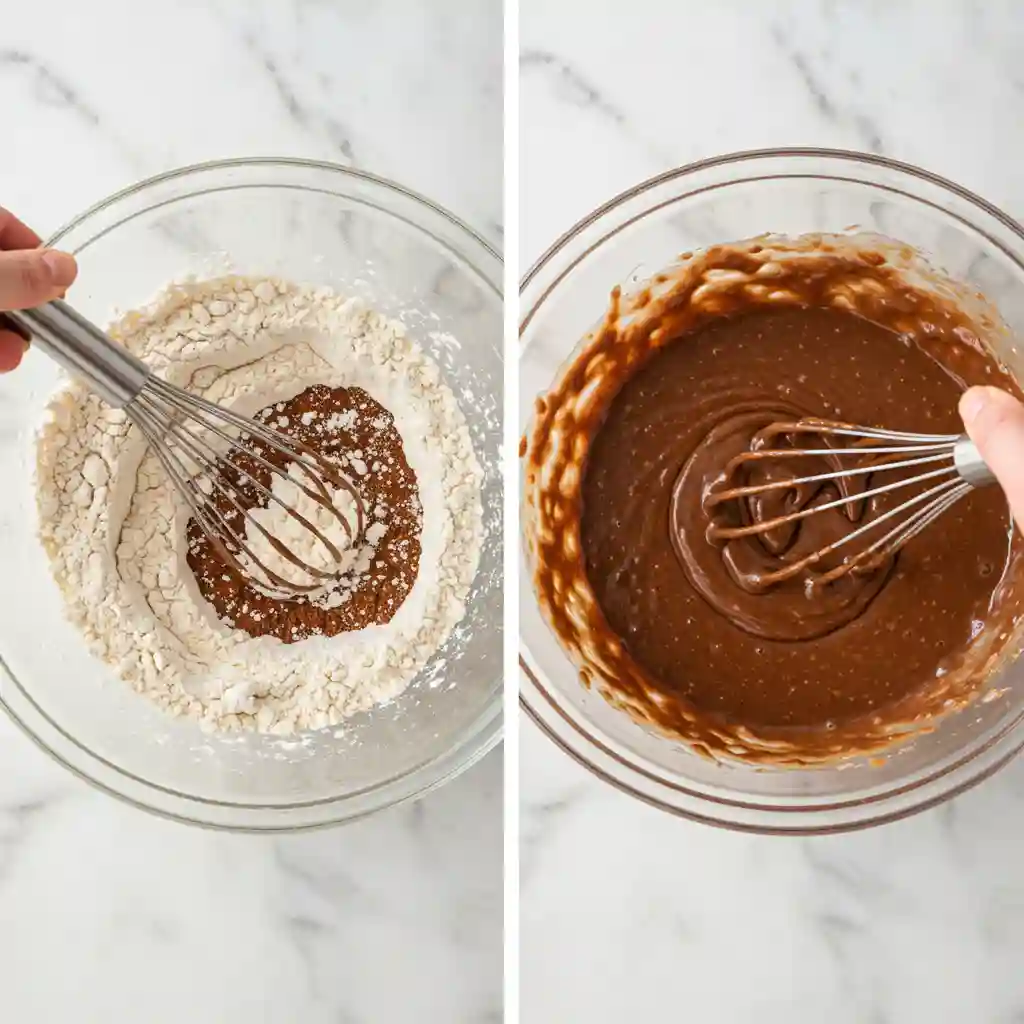
- Combine the Wet Base In a large mixing bowl, whisk together the milk, white sugar, light brown sugar, eggs, vinegar, and vanilla extract. Continue whisking for about a minute until the mixture is smooth, pale, and well combined. We will add the hot coffee in the final step, as its heat is needed to activate the cocoa powder.
- Incorporate the Dry Ingredients Add all your sifted dry ingredients (flour, cocoa powder, baking powder, baking soda, and salt) directly into the wet mixture. Whisk gently until everything is just combined. A few small lumps in the batter are perfectly fine. It is important not to over-mix at this stage, as that can develop the starches in the flour and lead to a tough cake.
- Activate with Hot Liquid Now, carefully pour the hot coffee or boiling water into the bowl. Whisk slowly and steadily until the batter is completely smooth and glossy. You will notice the batter is quite thin; this is exactly what you want! It is the secret to a super moist cake. Immediately pour the batter into your prepared pan(s). For a perfectly even layer cake, I recommend using a kitchen scale to divide the batter equally between the two pans.
- Bake to Perfection Place the cake(s) on the center rack of your preheated oven. Bake a 9×13 sheet cake for 35 to 45 minutes or two 8-inch layers for 32 to 37 minutes. The cake is done when a toothpick inserted into the center comes out with a few moist crumbs attached. A completely clean toothpick can mean the cake is slightly overbaked.
- Cool Completely Allow the cake(s) to cool in their pans on a wire rack for about 15 minutes. This initial cooling period helps the cake set and prevents it from breaking. Afterwards, carefully invert the pan(s) to release the cake onto the rack, peel off the parchment paper, and flip them back upright to finish cooling. It is absolutely crucial that the cakes are at room temperature before you begin frosting, as a warm cake will melt your beautiful buttercream instantly.
- Whip the Chocolate Buttercream While the cakes cool, prepare the frosting. In a large bowl with a handheld mixer or in a stand mixer, beat the softened butter on medium-high speed for 2 to 3 minutes until it becomes light, pale, and fluffy. This step incorporates air for a super creamy texture. Add the sifted cocoa powder and mix on low until combined. Next, add the sifted powdered sugar one cup at a time, mixing on low speed after each addition. Once all the sugar is in, add the vanilla and 2 tablespoons of milk. Increase the speed to medium-high and beat for another 2 to 3 minutes until the frosting is silky smooth. If it seems too thick, add more milk, one tablespoon at a time, until you reach a perfect, spreadable consistency.
- Assemble and Enjoy Once the cakes are completely cool, frost them with your homemade chocolate buttercream. Add sprinkles if you wish, slice, and enjoy the best gluten-free chocolate cake you have ever made.
3 Easy Frosting Recipes to Finish Your Cake
A great cake deserves a perfect frosting. Whether you prefer classic sweet buttercream, rich ganache, or a dairy-free option, one of these easy recipes will be the perfect finishing touch.
Option 1: Classic Chocolate Buttercream
This is a fluffy, classic American-style buttercream. It is sweet, creamy, and perfect for piping elaborate decorations or spreading for a rustic, simple look. This recipe is based on the ingredients provided in the main cake recipe.
Ingredients:
- ¾ cup (170g) butter, softened
- ½ cup (42g) unsweetened cocoa powder, sifted
- 3 to 5 cups (360-600g) powdered sugar, sifted
- 2 to 4 tablespoons (30-60ml) milk
- 2 teaspoons vanilla extract
Instructions:
- In a large bowl, beat the softened butter with an electric mixer on medium-high speed for 2 to 3 minutes until it is pale and fluffy.
- Add the sifted cocoa powder and mix on low speed until it is fully incorporated.
- Add the powdered sugar one cup at a time, mixing on low speed after each addition until it is combined.
- Add the vanilla extract and 2 tablespoons of milk. Beat on medium-high speed for another 2 to 3 minutes until the frosting is light and silky smooth. If the frosting is too thick, add more milk, one tablespoon at a time, to reach your desired consistency.
Option 2: Rich Chocolate Ganache (2 Ways)
For a richer, less sweet topping, a chocolate ganache is an elegant choice. It can be used as a silky, pourable glaze that drapes beautifully over the cake or chilled and whipped into a light, mousse-like frosting.
Ingredients:
- 8 ounces (225g) good quality dark or semi-sweet chocolate, finely chopped
- 1 cup (240ml) heavy cream
Instructions for a Pourable Glaze:
- Place the finely chopped chocolate in a heatproof bowl.
- Heat the heavy cream in a small saucepan over medium heat until it just begins to simmer.
- Immediately pour the hot cream over the chocolate. Let it sit undisturbed for 5 minutes to allow the chocolate to melt.
- Stir gently with a whisk until the ganache is completely smooth and glossy.
- Let it cool for 10 to 15 minutes, until slightly thickened, before pouring it over your cooled cake.
Instructions for a Whipped Ganache:
- Prepare the ganache as instructed above.
- Cover the bowl with plastic wrap, pressing it directly onto the surface of the ganache to prevent a skin from forming.
- Refrigerate for 1 to 2 hours, or until it is firm like peanut butter but still scoopable.
- Transfer the chilled ganache to a mixing bowl and whip it with an electric mixer on medium-high speed for 3 to 5 minutes, until it becomes light in color and fluffy.
Option 3: Dairy-Free Chocolate “Buttercream”
This dairy-free version delivers all the creamy texture and rich flavor of traditional buttercream, using simple plant-based swaps.
Ingredients:
- ¾ cup (170g) high-quality vegan butter sticks, softened
- ½ cup (42g) unsweetened cocoa powder, sifted
- 3 to 5 cups (360-600g) powdered sugar, sifted
- 2 to 4 tablespoons (30-60ml) non-dairy milk (such as almond, soy, or oat)
- 2 teaspoons vanilla extract
Instructions:
- In a large bowl, beat the softened vegan butter with an electric mixer on medium-high speed for 2 to 3 minutes until it is pale and creamy.
- Add the sifted cocoa powder and mix on low speed until fully combined.
- Gradually add the powdered sugar, one cup at a time, mixing on low speed until incorporated.
- Add the vanilla extract and 2 tablespoons of non-dairy milk. Beat on medium-high speed for another 2 to 3 minutes until the frosting is fluffy and smooth. Add more non-dairy milk as needed to achieve a spreadable consistency.
Pro Tips for Baking Success
These four simple tips will help you move from a good baker to a great one. Following these expert recommendations will guarantee your gluten-free cake turns out perfectly moist and tender every time.
Measure Your Flour Correctly
One of the most common mistakes in gluten-free baking is measuring flour incorrectly. Do not scoop your measuring cup directly into the bag of flour; this action compacts it and can result in you adding too much, leading to a dry cake. Instead, use a spoon to lightly fill your measuring cup, then use a straight edge, like the back of a knife, to level off the top. This method ensures you use the perfect amount of flour every time.
Use Room Temperature Ingredients
For a smooth, uniform batter, it is crucial that your cold ingredients are at room temperature, especially eggs and milk or sour cream. Cold ingredients do not mix or emulsify properly, which can cause the batter to clump and result in an uneven bake. A quick trick to warm up eggs is to place them in a bowl of warm (not hot) water for about five minutes before you use them.
Don’t Overbake
To achieve that perfect, moist crumb, it is very important not to overbake the cake. Start checking for doneness at the lower end of the baking time range. The cake is ready when a toothpick inserted into the center comes out with a few moist crumbs attached. If the toothpick comes out completely clean, the cake is likely a little overdone and will have a drier texture.
Always Use the Center Oven Rack
Where you place your cake in the oven significantly impacts the final result. Always bake on the center rack to ensure even heat circulation from all sides. Placing the cake too high in the oven can cause the top to cook too quickly, leading to a cracked and overly domed surface. The center position provides the most consistent heat for a level, evenly baked cake.
Gluten Free Chocolate Cake Troubleshooting Guide
Encountering a baking issue can be frustrating, but most problems have a simple solution. Use this guide to diagnose and fix common gluten-free cake challenges.
| Problem | Potential Cause(s) | Solution & Prevention |
| Cake is Dry & Crumbly | Over-measurement of flour; Overbaking; Wrong flour blend. | Spoon and level flour; Check for doneness early; Use a recommended 1-to-1 blend with xanthan gum. |
| Cake Sank in the Middle | Over-mixing the batter; Oven door opened too early; Too much moisture. | Mix only until ingredients are combined; Keep oven closed until the final minutes; Check flour for humidity. |
| Cake Has a Cracked Dome | Oven temperature is too high; Cake was baked on a rack placed too high. | Use an oven thermometer to verify temperature; Always use the center rack. |
Serving and Storage Tips
To keep your cake fresh and delicious, follow these simple storage tips. Thanks to its moist crumb, this cake stores exceptionally well.
Room Temperature
You can store the finished cake in an airtight container at room temperature for up to 3 to 4 days. It will remain very moist and tender.
Refrigerator
This cake also stores beautifully in the refrigerator without drying out. In an airtight container, it will stay fresh for about one week in the fridge.
Freezing
For longer-term storage, this cake freezes very well. You can freeze unfrosted cake layers ahead of time or freeze the entire frosted cake. First, allow the cake to cool completely. Then, wrap it tightly in plastic wrap or freezer-safe wrap and place it in the freezer. The cake can be frozen for up to three months. To thaw, simply let it sit at room temperature. If you are thawing a frosted cake, remember to remove the plastic wrap before letting it thaw to protect the frosting.
Conclusion
This gluten-free chocolate cake recipe is a true game changer, delivering a rich, fudgy crumb and deep chocolate flavor that will impress everyone, whether they eat gluten-free or not. Its simple, one-bowl method and consistently moist texture make it a reliable favorite for any occasion, from a simple weeknight treat to a special birthday celebration.
If you try this recipe, I would be so grateful if you could come back and leave a comment and a star rating below. Your feedback helps other bakers and lets me know what you enjoy! If you loved it, please consider sharing it on Pinterest or Facebook so others can discover it too. I would love to hear about your creations. What kind of frosting did you use, or did you add any unique variations? Let us all know in the comments!
More Gluten-Free cakes Recipes To Try!
Gluten Free Ice Cream Cake
Gluten-Free Pound Cake
gluten free chocolate cake
Ingredients
Dry Ingredients
- 2 ⅔ cups 380g Gluten-Free All-Purpose Baking Flour, sifted
- 1 cup 85g unsweetened cocoa powder, sifted
- 1 ½ teaspoon baking powder
- 1 teaspoon baking soda
- ½ teaspoon salt
Wet Ingredients
- 1 cup 240ml milk (dairy or non-dairy)
- 1 cup 200g granulated white sugar
- ¾ cup 165g light brown sugar, packed
- 3 large eggs at room temperature
- 1 teaspoon vinegar white or apple cider
- 1 tablespoon vanilla extract
- ⅔ cup 160ml neutral oil (canola, refined avocado, etc.)
- 1 cup 240ml hot brewed coffee or boiling water
For the Chocolate Buttercream
- ¾ cup 170g butter, softened (1 1/2 sticks)
- ½ cup 42g unsweetened cocoa powder, sifted
- 3-5 cups 360-600g powdered sugar, sifted
- 2-4 tablespoons 30-60ml milk (dairy or non-dairy)
- 2 teaspoons vanilla extract
Instructions
- Prepare for Baking First, position a rack in the center of your oven and preheat it to 350°F (180°C). Proper preheating is key for an even bake. Next, prepare your pan of choice, either one 9×13 inch pan or two 8-inch round pans. Generously spray the bottom of the pan(s) with oil, then line the bottom with a round of parchment paper. This simple step is my secret weapon; it guarantees the cakes will release flawlessly later on. Set your prepared pans aside.
- Combine the Wet Base In a large mixing bowl, whisk together the milk, white sugar, light brown sugar, eggs, vinegar, and vanilla extract. Continue whisking for about a minute until the mixture is smooth, pale, and well combined. We will add the hot coffee in the final step, as its heat is needed to activate the cocoa powder.
- Incorporate the Dry Ingredients Add all your sifted dry ingredients (flour, cocoa powder, baking powder, baking soda, and salt) directly into the wet mixture. Whisk gently until everything is just combined. A few small lumps in the batter are perfectly fine. It is important not to over-mix at this stage, as that can develop the starches in the flour and lead to a tough cake.
- Activate with Hot Liquid Now, carefully pour the hot coffee or boiling water into the bowl. Whisk slowly and steadily until the batter is completely smooth and glossy. You will notice the batter is quite thin; this is exactly what you want! It is the secret to a super moist cake. Immediately pour the batter into your prepared pan(s). For a perfectly even layer cake, I recommend using a kitchen scale to divide the batter equally between the two pans.
- Bake to Perfection Place the cake(s) on the center rack of your preheated oven. Bake a 9×13 sheet cake for 35 to 45 minutes or two 8-inch layers for 32 to 37 minutes. The cake is done when a toothpick inserted into the center comes out with a few moist crumbs attached. A completely clean toothpick can mean the cake is slightly overbaked.
- Cool Completely Allow the cake(s) to cool in their pans on a wire rack for about 15 minutes. This initial cooling period helps the cake set and prevents it from breaking. Afterwards, carefully invert the pan(s) to release the cake onto the rack, peel off the parchment paper, and flip them back upright to finish cooling. It is absolutely crucial that the cakes are at room temperature before you begin frosting, as a warm cake will melt your beautiful buttercream instantly.
- Whip the Chocolate Buttercream While the cakes cool, prepare the frosting. In a large bowl with a handheld mixer or in a stand mixer, beat the softened butter on medium-high speed for 2 to 3 minutes until it becomes light, pale, and fluffy. This step incorporates air for a super creamy texture. Add the sifted cocoa powder and mix on low until combined. Next, add the sifted powdered sugar one cup at a time, mixing on low speed after each addition. Once all the sugar is in, add the vanilla and 2 tablespoons of milk. Increase the speed to medium-high and beat for another 2 to 3 minutes until the frosting is silky smooth. If it seems too thick, add more milk, one tablespoon at a time, until you reach a perfect, spreadable consistency.
- Assemble and Enjoy Once the cakes are completely cool, frost them with your homemade chocolate buttercream. Add sprinkles if you wish, slice, and enjoy the best gluten-free chocolate cake you have ever made.
Notes
Nutrition Facts (per serving)
- Calories: 395kcal
- Carbohydrates: 52g
- Protein: 5g
- Fat: 21g
- Saturated Fat: 4g
- Polyunsaturated Fat: 4g
- Monounsaturated Fat: 11g
- Trans Fat: 0.1g
- Cholesterol: 54mg
- Sodium: 262mg
- Potassium: 177mg
- Fiber: 4g
- Sugar: 26g
- Vitamin A: 194IU
- Vitamin C: 0.2mg
- Calcium: 40mg
- Iron: 1mg
Frequently Asked Questions
Here are answers to some of the most common questions about making the perfect gluten-free chocolate cake.
How can I make my gluten-free chocolate cake moist and not dry?
The key to a moist gluten-free cake is using ingredients that add and retain moisture. This recipe uses a neutral oil which keeps the cake tender without weighing it down. Ingredients like milk, buttermilk, or sour cream also add significant moisture and richness. Finally, be careful not to overbake. The cake is ready when a toothpick inserted into the center comes out with a few moist crumbs still attached, not when it’s perfectly clean.
Why did my cake sink in the middle or crack on top?
A cake that sinks in the middle is often the result of overbeating the batter, which incorporates too much air and causes it to collapse after baking. A cracked top is typically caused by an oven temperature that is too high, making the cake rise too quickly. For best results, mix the batter only until the ingredients are just combined and ensure your oven is at the correct temperature by using the center rack for the most even heat.
What is the best gluten-free flour for this chocolate cake?
For consistent and reliable results, it’s best to use a high-quality all-purpose or “1-to-1” gluten-free flour blend. These blends are specifically designed for easy substitution in traditional baking. Look for a blend that already contains
xanthan gum, which is essential for binding the ingredients and giving the cake structure. Brands like
Bob’s Red Mill 1:1 Baking Flour and King Arthur Measure-for-Measure Flour are highly recommended for this recipe.
Can I make this recipe dairy-free?
Absolutely! This recipe is very easy to make dairy-free. Simply use your favorite non-dairy milk (like almond, soy, or oat milk) in the cake batter. For the frosting, use a high-quality vegan butter in place of regular butter and a non-dairy milk to achieve the right consistency.
How should I store gluten-free chocolate cake to keep it fresh?
You can store the cake in an
airtight container at room temperature for up to 3 or 4 days. Because it is so moist, it also keeps very well in the refrigerator for up to a week.
Can I use an egg substitute in this recipe?
This particular recipe relies heavily on eggs for its structure, so an egg substitute is not officially recommended. However, some bakers have reported success using alternatives like a
flax egg or applesauce, though results may vary. For a recipe that is specifically designed to be egg-free, it is best to seek out a tested vegan version.