That unmistakable buttery aroma of a fresh mall pretzel? For years, it was a temptation I had to resist. After my celiac diagnosis, I was determined to recreate that perfect, chewy bite I missed so dearly. This recipe for gluten free pretzels is the happy result of that quest. It’s more than just a snack; it’s a taste of nostalgia, perfected in my own kitchen to be both safe and incredibly delicious. Get ready to enjoy the warm, pillowy pretzels you thought were gone for good.
Why This Recipe Works
This isn’t just another gluten-free recipe; it’s a carefully crafted method designed for success. We achieve that authentic texture and flavor by using a specific combination of ingredients, like psyllium husk and tapioca starch, to replicate the classic pretzel “chew” that is so often missing in gluten-free baking. This results in an incredibly easy-to-handle dough. Unlike many sticky gluten-free doughs, this one is pliable and simple to roll and shape.
Furthermore, you’ll get that perfect golden-brown crust every time. The crucial baking soda bath step is the secret, guaranteeing that signature deep brown color and unmistakable pretzel flavor. To ensure you have total confidence in the kitchen, this guide is built for foolproof results, complete with a troubleshooting section and pro tips to help you succeed on your very first try.
Ingredients Needed for gluten free pretzels
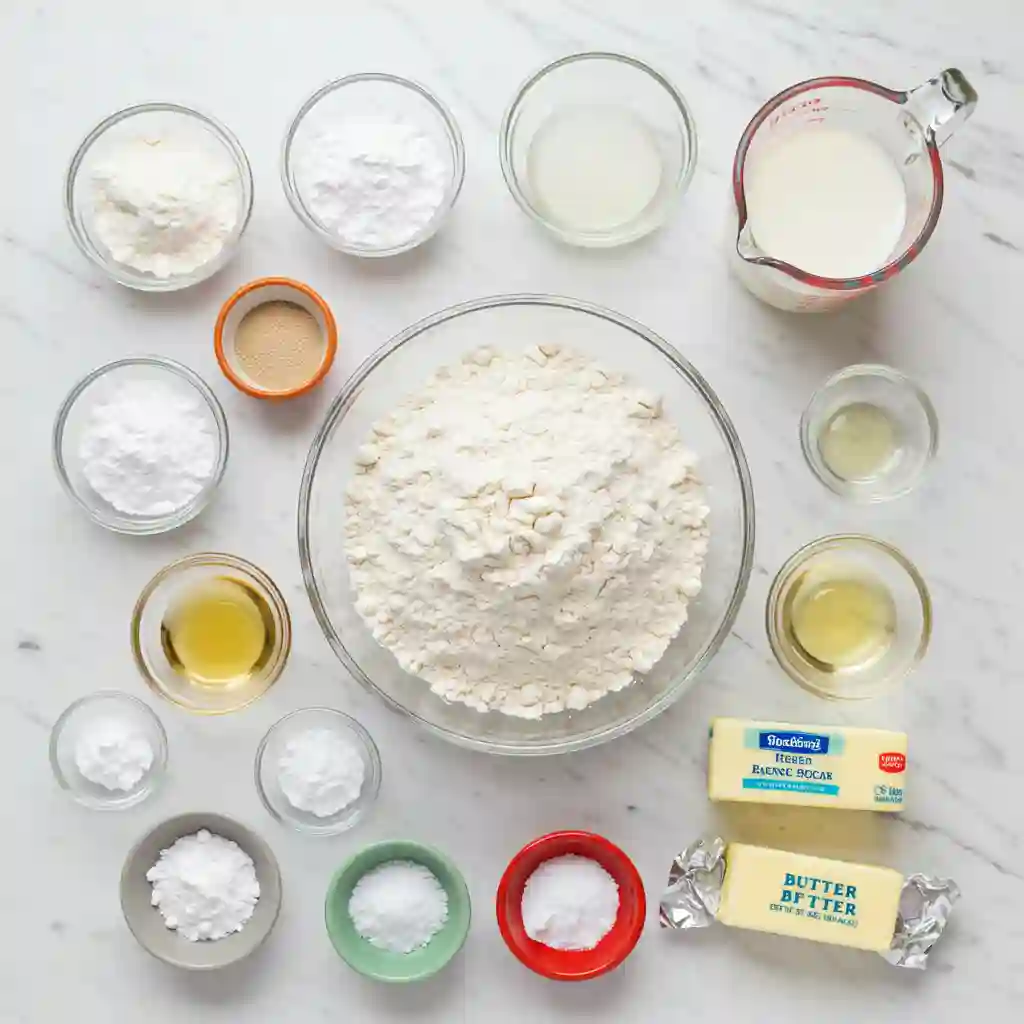
Here is everything you’ll need to gather for this recipe. For the best results, I highly recommend using a kitchen scale to measure your dry ingredients.
For the Pretzel Dough
- Warm Milk: Make sure it is heated to about 95°F to properly activate the yeast.
- Whole Psyllium Husk: This is essential for creating a flexible, chewy dough.
- All-Purpose Gluten-Free Flour Blend: Use a high quality blend, such as Better Batter or another blend that includes xanthan gum.
- Tapioca Starch: Also sold as tapioca flour, this adds extra stretch.
- Dry Milk Powder: This helps with browning and adds a rich flavor.
- Instant Yeast: For a reliable rise.
- Light Brown Sugar: Be sure to pack it firmly; it feeds the yeast and adds a hint of sweetness.
- Cream of Tartar: Reacts with other ingredients to help the pretzels rise.
- Baking Soda: A small amount is used in the dough itself for browning.
- Xanthan Gum: Omit this if your flour blend already contains it.
- Unsalted Butter: Melted for the dough.
- Large Egg Whites: Bring these to room temperature before using.
- Apple Cider Vinegar: This reacts with the leaveners to create a stable rise.
For the Baking Soda Bath
- Water
- Baking Soda: This is what gives the pretzels their classic dark crust and flavor.
A Head-to-Head Test: The Best Gluten Free Flour for Pretzels
Choosing the right flour can make or break your gluten-free baking projects. To take the guesswork out of it for you, I tested this recipe with multiple popular blends to see how they stacked up. Here are the results so you can choose the best option for your pretzels.
| Flour Blend | Dough Stickiness | Ease of Shaping | Final Texture | Notes & Recommendations | |
| King Arthur GF Bread Flour | Low | Very Easy | Soft, chewy, excellent structure. | Top Recommendation. The gluten free wheat starch in this blend provides superior, authentic results. | |
| Better Batter Classic Blend | Medium | Good | Soft with a good chew. | A fantastic all purpose choice that works reliably for this recipe. | |
| Bob’s Red Mill 1-to-1 | High | Can be difficult | Softer, less chewy. | Generally not recommended for yeast breads like pretzels, as it can result in a gummy texture. |
How to Make Gluten Free Pretzels
A quick note before you begin: This recipe requires at least one hour of chilling time for the dough and a second rising period for the shaped pretzels, so be sure to plan accordingly.
- Activate the Psyllium. Start by activating the key ingredient for a chewy texture. In a small bowl, vigorously whisk the whole psyllium husk into the warm milk. Set it aside for about a minute. You will see the mixture swell and form a loose gel; this is a crucial step that prevents the psyllium from clumping in the final dough.
- Combine the Dry Ingredients. In the large bowl of a stand mixer, add the gluten-free flour blend, xanthan gum, tapioca starch, milk powder, yeast, cream of tartar, baking soda, and brown sugar. Whisk everything together thoroughly to ensure the leaveners are evenly distributed and to break up any lumps from the brown sugar.
- Mix the Dough. Pour the psyllium and milk gel, along with the apple cider vinegar, melted butter, and egg whites, into the bowl with the dry ingredients. Using the paddle attachment, mix on a low speed until a shaggy, cohesive dough just comes together. Increase the mixer speed to medium-high and beat for a full 4 minutes. This extended mixing time is vital as it incorporates air, leading to a lighter pretzel crumb.
- Chill the Dough. Transfer the finished dough to a lightly oiled bowl or a proofing bucket and cover it tightly. Place the dough in the refrigerator to chill for at least 1 hour, or for up to 3 days. Chilling is essential because it firms up the dough, which makes it significantly easier to handle and shape. This resting period also allows the yeasted flavor to deepen.
- Shape the Pretzels. When you are ready to bake, line two large, rimmed baking sheets with parchment paper. Turn the chilled dough out onto a lightly floured surface and divide it into 8 equal portions. Working with one piece at a time, use the palms of both hands to roll the dough into a long rope, about 12 to 15 inches in length. To form the classic shape, create an upside-down “U”, then cross the two ends over each other twice to form a twist. Finally, fold the twisted ends down and press them firmly onto the bottom curve of the “U” to secure the shape.
- Let the Pretzels Rise. Arrange the shaped pretzels on your prepared baking sheets, leaving a couple of inches of space between them. Cover the sheets with lightly oiled plastic wrap and set them in a warm, draft-free location to rise until they look puffy and have noticeably increased in size.
- Prepare for Baking and the Soda Bath. As the pretzels near the end of their rise, preheat your oven to 400°F. In a large, wide pot, bring the water for the bath to a full, rolling boil and then add the baking soda. A vigorous boil is key to instantly setting the pretzel’s crust.
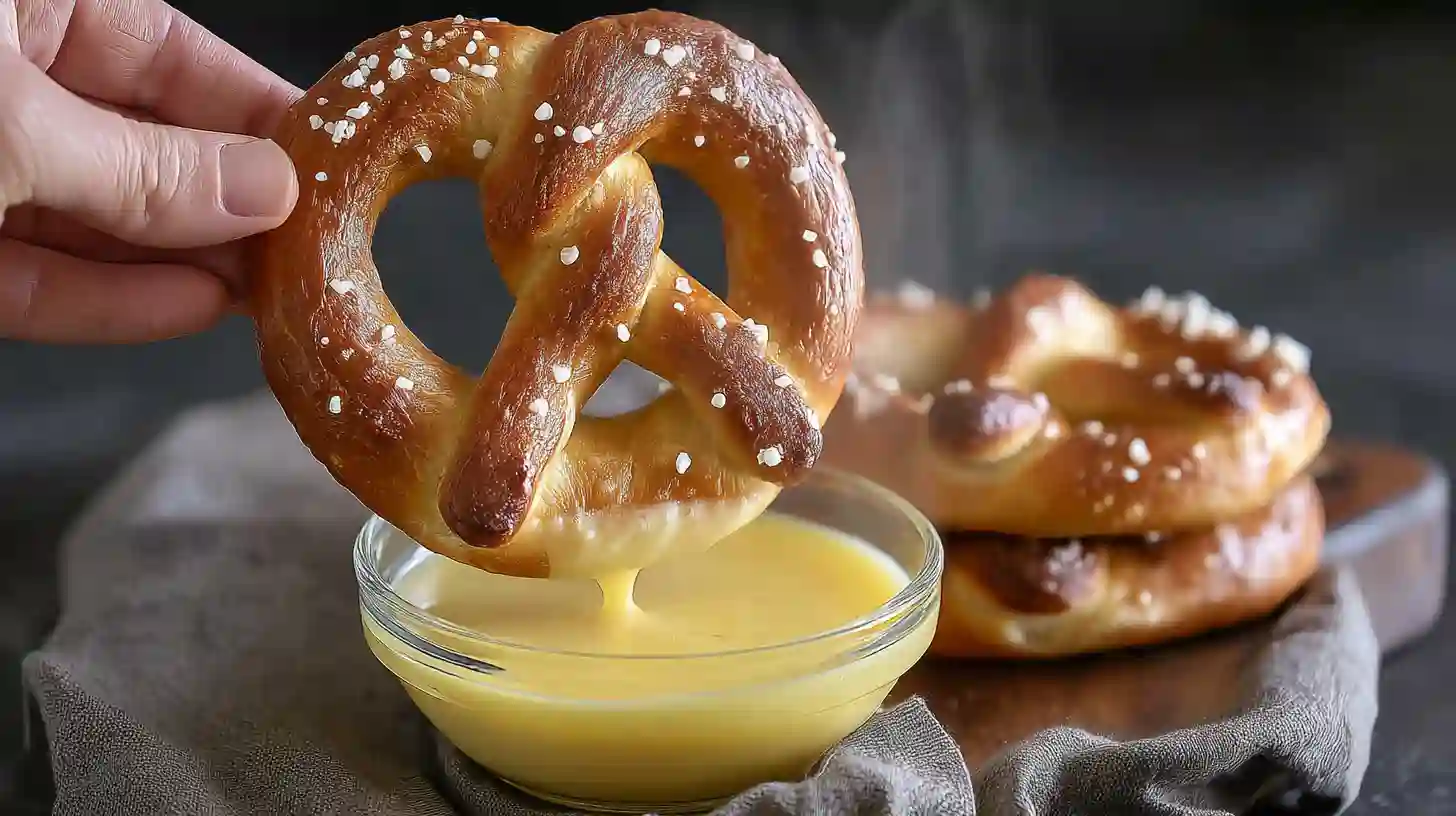
- Boil the Pretzels. Gently lower one or two pretzels at a time into the boiling water, taking care not to overcrowd the pot. Boil for about 30 seconds total, using a large slotted spoon to gently press the tops down to ensure the entire pretzel is submerged in the water. This quick bath is the secret to achieving that signature chewy exterior.
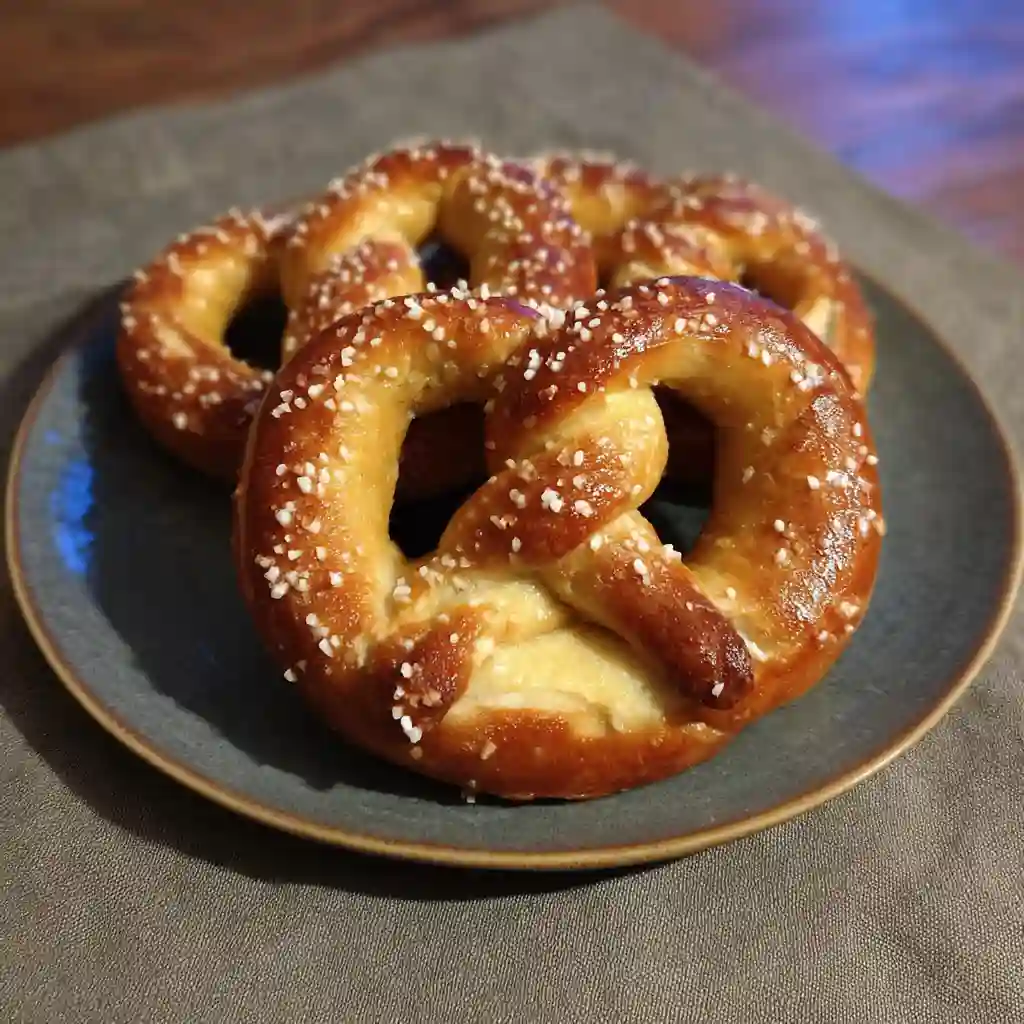
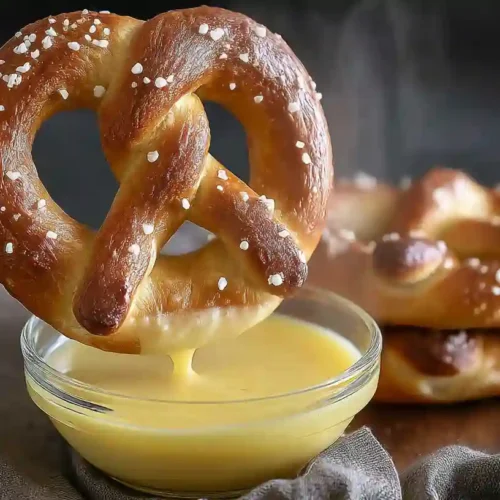
- Bake to a Golden Brown. Using a strainer or slotted spoon, lift the boiled pretzels from the water, let any excess liquid drip off, and return them to the baking sheet. After all the pretzels have been boiled, brush them generously with melted butter and sprinkle them with coarse salt. Place the baking sheet in the oven and bake for 15 minutes. Reduce the oven temperature to 350°F and continue to bake until the pretzels are a deep golden brown all over and feel firm to the touch.

Pro Tips for Foolproof Pretzels
Follow these key tips to ensure your gluten-free pretzels turn out perfectly every single time.
- Weigh Your Flour Gluten-free baking is a science, and a kitchen scale provides much more accuracy than measuring cups. Measuring your flour by weight is the single best way to guarantee consistent results and the perfect dough texture.
- Don’t Over-proof If the dough rises too much, it can become fragile and collapse when it hits the boiling water. You should watch for the pretzels to rise until they are puffy, about 50-75% larger than their original size, not necessarily doubled. Avoid letting them get to the point where the surface begins to break or crater.
- A Rolling Boil is Crucial A weak simmer will not work for this recipe; it will only make your dough wilt and become soggy. To get that signature chewy crust, you must bring the baking soda bath to a full, vigorous, rolling boil before adding the pretzels. This instantly seals the exterior of the dough.
- Don’t Boil for Too Long The soda bath is a quick dip, not a long soak. Boiling the pretzels for more than a minute can cause them to develop an unpleasant metallic taste. A brief boil is all you need to achieve the desired color and texture.
Fun Variations on the Classic Pretzel
Once you have mastered the basic recipe, the dough is incredibly versatile. Here are a few fun ways to switch things up.
Gluten Free Pretzel Bites
For a perfect party snack, turn this recipe into pretzel bites. After you have rolled the dough into long ropes, simply use a knife to cut them into 1.5 inch pieces. Follow the same instructions for the baking soda bath and baking time. These mini pretzels are perfect for dipping and sharing.
Gluten Free Cinnamon Sugar Pretzels
To satisfy a sweet tooth, make a batch of cinnamon sugar pretzels. Prepare and shape the pretzels as directed, but do not sprinkle them with salt before baking. Once they are baked and still warm, brush each pretzel generously with melted butter. In a shallow dish, mix together granulated sugar and cinnamon, then dip each buttered pretzel into the mixture until it is fully coated.
Gluten Free Pretzel Dogs
Create a fun and satisfying meal by making gluten free pretzel dogs. To do this, roll the dough ropes slightly thinner than you would for a normal pretzel. Tightly wrap each rope of dough around a gluten free hot dog. Proceed with the boiling and baking steps as outlined in the main recipe, baking until the pretzel dough is a deep golden brown.
3 Simple Dipping Sauces
A great pretzel deserves a great dip. While they are delicious on their own, these simple sauces elevate the experience.
Sweet Mustard Dipping Sauce
This classic sweet and tangy mustard sauce is the perfect partner for a salty pretzel. To make it, simply combine 6 tablespoons of mayonnaise, 1 tablespoon of Dijon mustard, 3 tablespoons of honey, and ¼ teaspoon of kosher salt in a small bowl. Whisk everything together until it is smooth and well combined. For an extra depth of flavor, you can also add ½ teaspoon of dry mustard powder.
Quick Cheesy Queso Dip
A warm, savory cheese sauce is a fantastic option. For a simple queso, melt 1 cup of shredded cheddar or Monterey Jack cheese with ¼ cup of milk in a small saucepan over low heat, stirring until smooth. You can season it with a pinch of chili powder or a tablespoon of your favorite salsa. Other popular choices include beer cheese or nacho cheese sauce.
Vanilla Icing Dip
For a sweet, dessert-like treat, a vanilla icing dip is a perfect choice. In a small bowl, whisk together 1 cup of powdered sugar with 2 tablespoons of milk and ½ teaspoon of vanilla extract. If the icing is too thick, add more milk, one teaspoon at a time, until you reach a smooth, dippable consistency.
Serving and Storage Tips
Follow these tips to keep your pretzels tasting their best, whether you’re enjoying them now or saving some for later.
Storing at Room Temperature
These pretzels are definitely best enjoyed fresh and warm on the day they are baked. If you have any leftovers, you can store them in an airtight container at room temperature for up to two days.
Freezing for Longer Storage
For longer storage, freezing is the best option. Once the pretzels have cooled completely, wrap each one tightly in plastic wrap or freezer-safe wrap and place them in a freezer bag or airtight container. They can be frozen for up to three months. For the best results, avoid salting any pretzels you plan to freeze, as the salt can draw out moisture and make them go stale faster.
How to Reheat
To refresh your stored pretzels and make them soft again, simply spritz them lightly with some water. You can then warm them in a toaster oven at 300-350°F until they are heated through. Alternatively, you can reheat them in the microwave for about 30 to 60 seconds until they soften up.
Conclusion
With its authentic chewy texture and an easy to handle dough, this gluten free soft pretzel recipe is a true game changer, proving you never have to miss out on your favorite snacks again. It delivers that classic, buttery flavor you have been craving in a simple, reliable method.
If you give these pretzels a try, I would be so grateful if you could come back and leave a comment and a star rating on the recipe card below. Your feedback is incredibly helpful and allows other bakers to find and enjoy this recipe too! I love seeing your kitchen creations, so please feel free to share a photo of your finished pretzels on Pinterest or Facebook. I am always curious to see how you make a recipe your own. What dipping sauces or fun variations did you try? Let us know in the comments!
More Gluten Free Recipes To Try!
Gluten Free Pretzels
Ingredients
Pretzel Dough
- 240 ml warm milk heated to about 95°F
- 2 tbsp whole psyllium husk
- 320 g gluten-free flour blend such as Better Batter, with xanthan gum
- 100 g tapioca starch also known as tapioca flour
- 2 tbsp dry milk powder
- 2 1/4 tsp instant yeast
- 2 tbsp light brown sugar packed
- 1/2 tsp cream of tartar
- 1/2 tsp baking soda
- 1/2 tsp xanthan gum omit if already included in flour blend
- 3 tbsp unsalted butter melted
- 2 large egg whites at room temperature
- 1 tbsp apple cider vinegar
Baking Soda Bath
- 2 L water
- 1/4 cup baking soda
Instructions
- In a small bowl, whisk the whole psyllium husk into warm milk. Let it sit for 1 minute until it forms a loose gel.
- In the bowl of a stand mixer, combine gluten-free flour, xanthan gum, tapioca starch, dry milk powder, yeast, cream of tartar, baking soda, and brown sugar. Whisk well.
- Add the psyllium gel, melted butter, egg whites, and vinegar to the dry ingredients. Mix on low until combined, then beat on medium-high for 4 minutes.
- Transfer dough to an oiled bowl and cover. Chill for at least 1 hour, or up to 3 days.
- Turn chilled dough onto a floured surface and divide into 8 pieces. Roll each into a 12–15 inch rope and shape into pretzels.
- Place pretzels on parchment-lined baking sheets. Cover and let rise in a warm place until puffy, about 50–75% larger in size.
- Preheat oven to 400°F. Bring 2 liters of water to a boil in a large pot, then add baking soda.
- Gently boil pretzels in the baking soda bath for 30 seconds each. Use a slotted spoon to press them down and remove.
- Return pretzels to the baking sheet, brush with melted butter, and sprinkle with salt.
- Bake for 15 minutes, then reduce oven to 350°F and bake until golden brown and firm, about 10–15 more minutes.
Notes
Frequently Asked Questions (FAQ)
Which pretzel brands are gluten-free?
While this recipe helps you make delicious pretzels at home, you can also find gluten free options in stores. One commonly available brand is Snyder’s of Hanover, which offers a gluten free variety. Many other snack companies now provide gluten free versions, so it is always a good idea to check the packaging in the snack aisle for a “gluten free” certification.
Can you eat pretzels with celiac disease?
You cannot eat traditional pretzels made with wheat flour if you have celiac disease. However, you can absolutely enjoy pretzels that are specifically made to be gluten free, like the ones in this recipe or any brand that is certified gluten free. These are made with safe, alternative flours instead of wheat.
How to tell if pretzels are gluten-free?
The most reliable way to tell if pretzels are gluten free is to check the packaging. Look for a clear “certified gluten free” label from a trusted organization. It is also important to read the ingredients list to ensure no gluten containing ingredients are present and to check for allergen warnings about shared equipment or facilities to avoid cross contamination.
Are all Snyder’s pretzels gluten-free?
No, not all Snyder’s of Hanover pretzels are gluten free. The company produces a wide range of traditional wheat based pretzels. However, they have a specific line of products that are clearly labeled as “Gluten Free,” which are safe for those who cannot have gluten.
Does Trader Joe’s sell gluten-free pretzels?
The provided articles do not mention whether Trader Joe’s sells pre-made gluten free pretzels. One source does discuss Trader Joe’s gluten free flour, but not the finished snack product.
Are UTZ pretzels gluten-free?
Information about whether UTZ pretzels are gluten free is not available in the provided sources.
Does Rold Gold pretzel have gluten?
The provided articles do not contain information about the gluten content of Rold Gold pretzels.
What is surprisingly not gluten-free?
Hidden gluten can sometimes be found where you do not expect it. For example, some baking ingredients may contain hidden gluten. When it comes to snacks and dips to go with your pretzels, it is important to be aware that some brands of nacho cheese sauce contain wheat and are not gluten free.
Gluten-Free Soft Pretzels
Recreate that classic mall experience with these Auntie Anne’s-style gluten-free soft pretzels. Perfectly chewy, buttery, and soft, this recipe delivers an irresistible gluten-free treat with a golden-brown crust.