Unlocking the secrets of the perfect Red Velvet Buttermilk Cake requires understanding the delicate balance of acidity, cocoa, and texture. This comprehensive guide explores the culinary science behind achieving a velvety crumb, vivid crimson hue, and distinct tangy flavor profile that defines this classic dessert.
From selecting the optimal red velvet cake ingredients to mastering the reaction between buttermilk and baking soda, we provide the essential techniques for baking a moist, bakery-quality cake.
Ideal for holidays and celebrations, this resource ensures flawless results every time, elevating your baking repertoire with precision and expertise.
Red Velvet Buttermilk Cake: The Ultimate Moist Recipe
Equipment
- Mixing bowl
- Cake Pans
- Whisk
- Spatula
- Electric mixer
Ingredients
Dry Ingredients
- 2.5 cups all-purpose flour
- 1.5 cups granulated sugar
- 1 tsp baking soda
- 1 tsp fine salt
- 1 tsp unsweetened cocoa powder
Wet Ingredients
- 1.5 cups vegetable oil
- 1 cup buttermilk room temperature
- 2 large eggs room temperature
- 2 tbsp red liquid food coloring
- 1 tsp vanilla extract
- 1 tsp white vinegar
Frosting
- 16 oz cream cheese softened
- 1 cup unsalted butter softened
- 4-5 cups powdered sugar sifted
- 1.5 tsp vanilla extract
- pinch of salt
Instructions
- Preheat oven to 350°F (175°C). Grease two 9-inch round cake pans and line with parchment paper for easy removal.
- In a large bowl, whisk together flour, sugar, baking soda, salt, and cocoa powder until well combined.
- In another bowl, mix vegetable oil, buttermilk, eggs, red food coloring, vanilla extract, and white vinegar until smooth.
- Add the wet mixture to the dry ingredients and mix gently until just combined. Do not overmix.
- Divide batter evenly between prepared pans and bake for 28–32 minutes, or until a toothpick inserted in the center comes out clean. Cool in pans 10 minutes, then transfer to wire racks to cool completely.
- For the frosting: Beat softened cream cheese and butter until fluffy. Gradually add powdered sugar, vanilla extract, and a pinch of salt, mixing until smooth and spreadable.
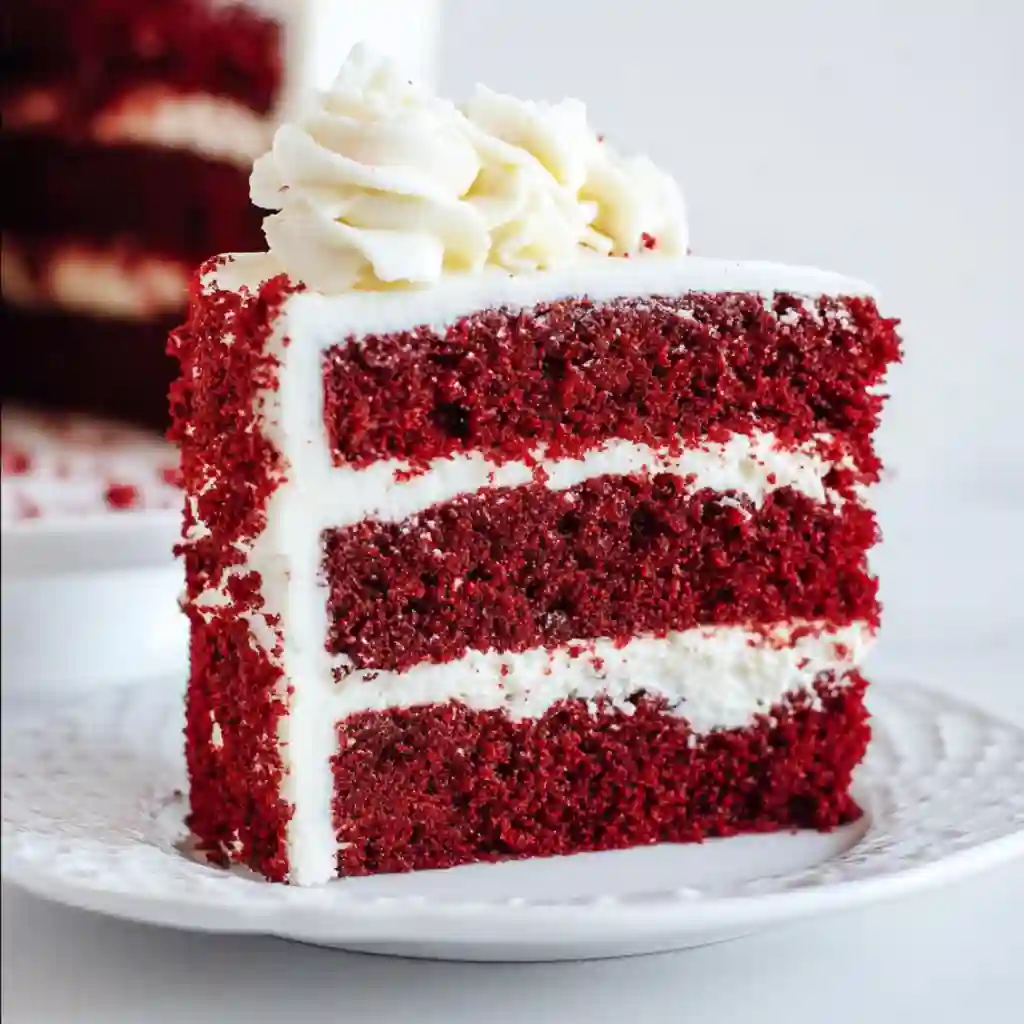
- Assemble the cake: Place one cake layer on a plate, spread a generous layer of frosting, top with second cake layer, then frost the top and sides.
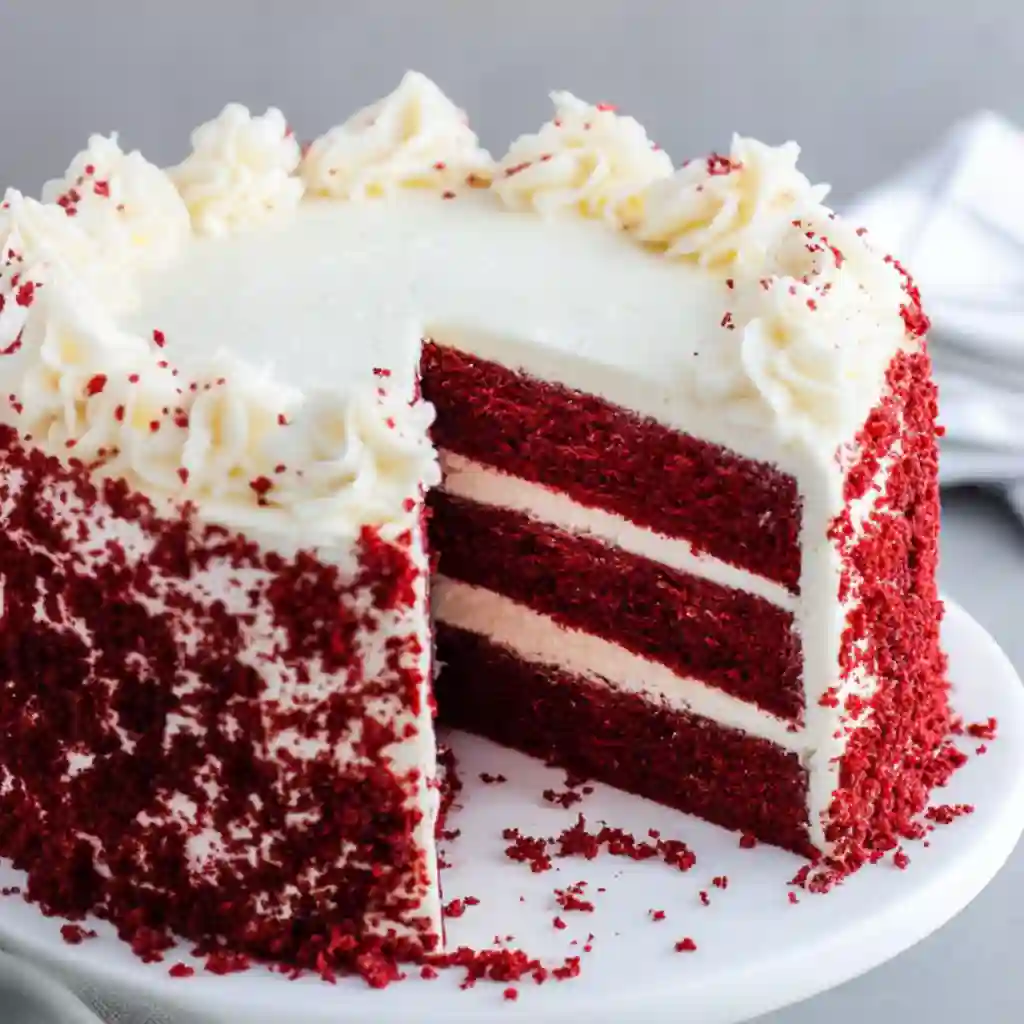
Table of Contents
The Allure of the Classic Red Velvet Buttermilk Cake
Defining the Flavor Profile
I vividly remember the first time I truly understood the complexity of this dessert; I was standing in the kitchen of my neighbor, Madame Dubois, a fastidious French woman who typically scoffed at American confections.
Yet, as she handed me a slice of what I now recognize as the best red velvet cake recipe, she explained that its beauty lay not in sweetness, but in the subtle interplay of acids.
There is a prevalent and somewhat frustrating misconception among novice bakers that Red Velvet is merely a simple red velvet cake recipe consisting of chocolate cake dyed with excessive amounts of food coloring.
This reductionist view fails to acknowledge the unique flavor profile that distinguishes a true Red Velvet Buttermilk Cake from its cocoa-heavy counterparts.
The authentic taste is a sophisticated triad: a mild, almost whispered chocolate flavor derived from a small amount of cocoa powder, a tangy, acidic undertone provided by the buttermilk and vinegar, and a buttery, vanilla-rich finish that rounds out the palate. It is this specific balance neither too chocolaty nor vanilla-plain that creates the enigmatic allure of the cake.
A Brief History of the “Velvet” Texture
To appreciate why we strive for a specific texture today, one must trace the lineage of the “Velvet Cake.” Historians note that during the Victorian era, the term “velvet” was utilized to describe cakes with a specifically fine, soft crumb, distinct from the coarser sponge cakes of the time. This texture was often achieved through the reaction of acidic ingredients with baking soda.
The vibrant red color we associate with the cake today became popularized during the Great Depression by the Adams Extract company, which marketed red food dye with tear-off recipe cards to boost sales.
Over decades, the Red Velvet Buttermilk Cake cemented itself as a staple of Southern cuisine, becoming inextricably linked to celebrations such as Juneteenth and Christmas.
While a red velvet cake mix from a box might offer convenience, it lacks the historical depth and textural nuance that can only be achieved through scratch baking.
The evolution from a cocoa-reaction reddish-brown to the vivid scarlet of modern times mirrors the changes in cocoa processing and the availability of synthetic dyes, yet the demand for that signature velvety texture remains unchanged.
The Science: Why Buttermilk is Essential
The Chemistry of Acid and Cocoa
The structural integrity and rise of this cake are fundamentally rooted in a specific chemical reaction, one that I find endlessly fascinating to observe. When I mix the batter, I am essentially conducting a chemistry experiment where the acidic components specifically the buttermilk and white vinegar react vigorously with the alkaline baking soda (sodium bicarbonate).
This reaction releases carbon dioxide gas, which forms tiny bubbles throughout the batter. These bubbles expand in the heat of the oven, providing the lift and aeration necessary for that signature “velvet” crumb.
This is why the question, “do you need buttermilk for red velvet cake?” is answered with a resounding yes by culinary purists.
Without this acidic medium, the baking soda would not activate properly, resulting in a dense, flat puck rather than a fluffy layer. Furthermore, historically, natural cocoa powder (which is acidic) would react with the buttermilk to reveal a reddish anthocyanin pigment.
Modern Dutch-processed cocoa is alkalized and neutralized, meaning a contemporary Red Velvet Buttermilk Cake relies heavily on the added acidity of buttermilk and vinegar to replicate the texture, even if we now use dye for the color.
Moistness and Tenderizing Agents
Beyond the rise, buttermilk plays a crucial role in tenderizing the gluten networks within the flour. The lactic acid present in buttermilk breaks down the long, tough strands of gluten, preventing the cake from becoming chewy or tough. This results in a softness that milk alone simply cannot achieve.
In my extensive testing of various formulas, including the red velvet cake recipe jamie oliver promotes, I have found that the fat source is equally critical for moisture retention. While butter provides flavor, oil is superior for coating flour proteins and remaining liquid at room temperature.
This is why a red velvet buttermilk cake with oil will stay moist for days longer than an all-butter version. The oil encapsulates the water molecules, preventing evaporation and ensuring that the moist red velvet buttermilk cake retains its succulent texture from the first slice to the last.
The synergy between the tenderizing acid of the buttermilk and the lubricating properties of the vegetable oil creates a crumb that is simultaneously sturdy enough to stack and soft enough to melt on the tongue.
Essential Ingredients for the Best Results
Choosing the Right Flour and Cocoa
The selection of flour is a subject of much debate in the baking community, often polarizing those who prefer structure against those who desire lightness. In my experience, while All-Purpose flour provides a reliable structure, cake flour is the superior choice for a moist red velvet cake recipe.
Cake flour has a lower protein content (usually around 7-9%) compared to AP flour (10-12%), which means less gluten development and a finer, softer crumb. This contributes significantly to the “melting” sensation one expects from a high-quality cake.
The cocoa dilemma is equally significant. One must resist the urge to use premium Dutch-processed cocoa powder
. Because Dutch-processed cocoa has been treated with an alkalizing agent to reduce acidity, it will not react as vigorously with the baking soda.
For the best red velvet cake recipe, standard natural unsweetened cocoa powder is essential. It retains its natural acidity, which is vital for the leavening reaction that defines the Red Velvet Buttermilk Cake.
The Food Coloring Controversy
The vibrant hue of Red Velvet is its most recognizable visual characteristic, yet achieving it without compromising flavor requires care. I often encounter recipes, such as the red velvet cake recipe mary berry is known for, that use varying amounts of dye.
The options generally fall into three categories: liquid red dye, gel paste, and natural alternatives. Liquid dye is traditional and inexpensive but requires a larger volume to achieve a deep color, which can add excess liquid to the batter. Gel paste is highly concentrated, allowing for intense saturation without altering the moisture balance.
For those seeking a natural approach, a red velvet cake with beetroot and buttermilk utilizes beet puree to provide moisture and an earthy sweetness alongside the color. However, strictly speaking, beet-based cakes have a distinct flavor profile that differs from the classic.
To achieve a vibrant red hue without imparting a chemical aftertaste, I recommend using a high-quality “no-taste” red gel coloring. This ensures the aesthetic appeal of the original red velvet cake recipe without the metallic bitterness that cheap dyes can introduce.
The Role of Vinegar and Baking Soda
It might seem redundant to include vinegar when buttermilk is already present, but in the context of this specific cake, it is a non-negotiable insurance policy for texture. The combination of distilled white vinegar and baking soda provides an immediate, powerful leavening boost right before the batter enters the oven.
I have experimented with a red velvet cake recipe without buttermilk and vinegar, and the results were invariably disappointing—heavy, dense, and lacking that characteristic tang. The vinegar reinforces the acidity needed to fully neutralize the baking soda and stabilize the color.
It is a critical component of the red velvet cake ingredients list. When these two ingredients interact, they create a fizzy expansion that aerates the batter one final time.
This chemical reaction is the secret behind the lightness of a simple red velvet cake recipe, ensuring that the density of the oil and sugar does not weigh down the final product.
Step-by-Step Baking Instructions
Mixing Method: Creaming vs. Oil-Based
There are generally two schools of thought regarding the mixing method: the Creaming Method, used for butter-based cakes, and the Muffin (or blending) Method, used for oil-based cakes. A traditional red velvet buttermilk cake recipe often calls for creaming butter and sugar to create air pockets.
However, because we established that oil is superior for moisture, this guide recommends an oil-based approach using a modified blending method. In my trials, comparing a red velvet buttermilk cake with oil against butter-heavy versions, the oil-based cakes consistently demonstrated a superior crumb.
The method involves whisking the wet ingredients (oil, buttermilk, eggs, dye) separately from the dry, then combining them. This minimizes the risk of overmixing, which can lead to a tough cake.
While a red velvet cake recipe mary berry might rely on butter for flavor, the addition of buttermilk provides enough richness that the neutral oil serves the texture better, creating a moist red velvet buttermilk cake that remains tender even after refrigeration.
The Mixing Process
The actual mixing process requires precision and patience to ensure a homogeneous batter without overworking the gluten.
I start by sifting the dry ingredients flour, sugar, baking soda, salt, and cocoa into a large bowl. Sifting is mandatory here; cocoa powder is notorious for clumping, and a burst of bitter, dry cocoa in a finished slice is a flaw we must avoid.
In a separate vessel, I emulsify the wet ingredients. It is imperative that the eggs and buttermilk are at room temperature. Cold ingredients will not emulsify properly with the oil, leading to a greasy or uneven batter.
When combining the two mixtures, I pour the wet into the dry and whisk gently until just combined. If you are using a red velvet cake mix, the instructions are often simplified, but for scratch baking, stopping the mixer the moment the flour streaks disappear is vital. This attention to detail is what elevates a home-baked cake to the level of the best red velvet cake recipe.
Baking for the Perfect Rise
Baking is the final transformation, where heat sets the structure we have so carefully built. I preheat my oven to exactly 350°F (175°C), verifying the temperature with an internal oven thermometer, as dials are often inaccurate.
I prepare my pans by greasing them and lining the bottoms with parchment paper—a step I never skip, as Red Velvet is tender and prone to sticking. Visual cues are more reliable than timers. I look for the cake to pull away slightly from the edges of the pan and for the center to spring back when gently pressed.
The “spring back” test confirms that the protein structure has set. Overbaking is the enemy of a moist red velvet cake recipe; leaving the cake in the oven even three minutes too long can evaporate the moisture we worked so hard to retain.
Once baked, I allow the cakes to cool in the pans for ten minutes before transferring them to a wire rack. This brief rest allows the structure to firm up, preventing the Red Velvet Buttermilk Cake from crumbling upon release.
The Perfect Pairing: Frosting Options
Traditional Ermine Frosting (Boiled Milk)
While Cream Cheese frosting is the contemporary standard, the original red velvet cake recipe was traditionally served with Ermine frosting, also known as boiled milk frosting or flour buttercream.
I find this historical pairing to be exceptionally delightful because it is less sweet than modern buttercreams, allowing the subtle cocoa and tang of the cake to shine.
To make it, I cook flour and milk into a thick paste (roux), let it cool, and then whip it into softened butter and granulated sugar until it resembles whipped cream. The texture is ethereal light, airy, and silky.
For those who find standard frosting too sugary, pairing your Red Velvet Buttermilk Cake with Ermine frosting offers a sophisticated, nostalgic experience that harkens back to the cake’s mid-century popularity.
It requires a bit more technical skill than powdered sugar frostings, but the result is a perfectly balanced dessert that honors the cake’s lineage.
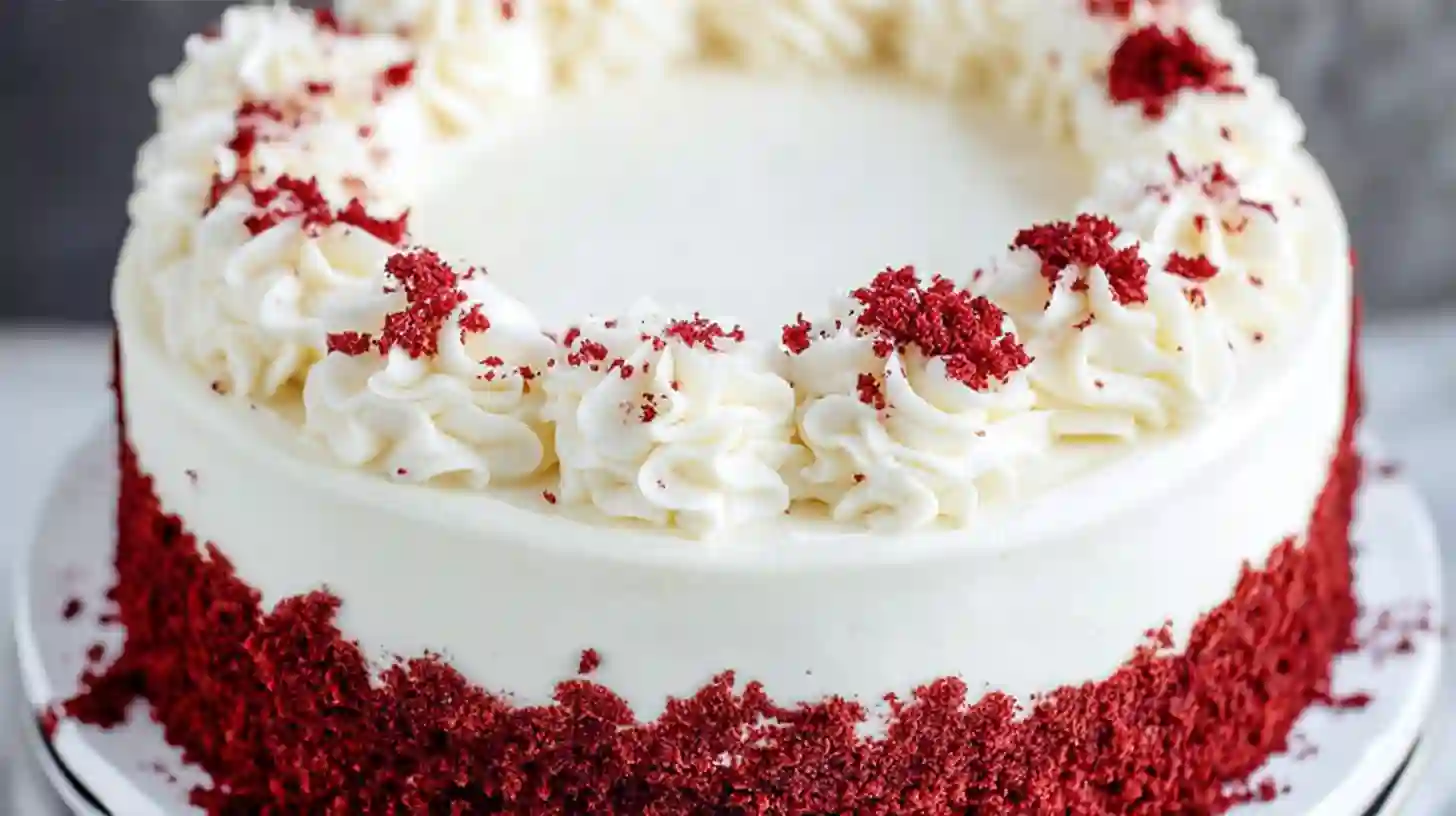
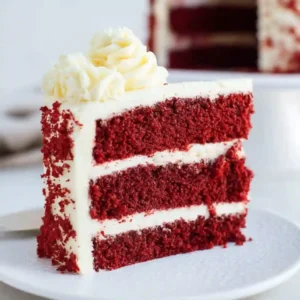
The Modern Favorite: Cream Cheese Frosting
Despite the historical accuracy of Ermine, there is no denying that red velvet buttermilk cake with cream cheese frosting is the combination that dominates the modern palate.
The tangible tang of the cream cheese mirrors and amplifies the tang of the buttermilk and vinegar in the cake, creating a cohesive flavor profile.
When I prepare this frosting, I ensure the butter and cream cheese are perfectly softened to avoid lumps. I prefer a ratio of one part butter to two parts cream cheese, stabilized with sifted powdered sugar.
A common issue is a runny frosting that slides off the layers; to prevent this, I advise against over-beating the cream cheese, which can break down its structure. A well-executed cream cheese frosting provides a rich, creamy counterpoint to the fluffy crumb of the red velvet buttermilk cake recipe, cementing its status as a crowd favorite.
Troubleshooting and Variations
Common Red Velvet Mistakes
Even with a detailed guide, issues can arise. A frequent question I receive is, “Why did my cake turn brown?” This is almost always due to using Dutch-processed cocoa, which neutralizes the acids, or simply not using enough red dye. Remember, the cocoa itself adds brown tones, so the dye must be sufficient to overcome them.
Another common complaint is dryness. If you find your cake is not a moist red velvet buttermilk cake, it is likely due to overbaking or substituting butter for the oil without adjusting the other liquids. It is crucial to strictly adhere to the fat and liquid ratios.
Furthermore, if the cake sinks in the middle, it suggests that the oven door was opened too early or the leavening agents (baking soda and vinegar) were old and inactive. Ensuring the freshness of your red velvet cake ingredients is paramount for success.
Dietary Adjustments
For those with dietary restrictions, the Red Velvet Buttermilk Cake can be adapted. A gluten-free red velvet buttermilk cake can be achieved by substituting the all-purpose flour with a high-quality measure-for-measure gluten-free flour blend that contains xanthan gum.
The moisture from the oil and buttermilk helps prevent the dryness often associated with gluten-free baking.
Regarding dairy, I am often asked, “can you make red velvet cake without buttermilk?” The answer is yes, but with modifications.
You can create a buttermilk substitute for red velvet cake by adding a tablespoon of lemon juice or white vinegar to a cup of whole milk and letting it sit for ten minutes until it curdles.
While this mimics the acidity needed for the baking soda reaction, it lacks the viscosity and depth of flavor of true buttermilk. For a red velvet cake recipe without buttermilk, one might use sour cream or yogurt thinned with milk, but true buttermilk remains the gold standard for the authentic texture.
More easy Recipes To Try!
Zesty Shrimp And Avocado Rice Bowls
Frequently Asked Questions
What does buttermilk do for red velvet cake?
In the context of baking science, buttermilk is a multitasker. It tenderizes gluten to ensure a soft crumb, provides a distinct tangy flavor that balances the sugar, and, most importantly, activates the baking soda to promote rising.
This is why the question “do you need buttermilk for red velvet cake” is critical; without it, you lose texture, height, and flavor complexity.
Is red velvet cake just chocolate cake with red dye?
This is a widespread myth. A simple red velvet cake recipe is not merely a chocolate cake disguised in red.
It has a distinct flavor profile with significantly less cocoa powder than a standard chocolate cake. The flavor is defined by the unique combination of mild chocolate, the acidity from the vinegar and buttermilk, and the vanilla.
Why do you put vinegar in red velvet cake?
Vinegar is included to ensure a robust chemical reaction with the baking soda. Even in a red velvet cake without buttermilk, vinegar would be necessary to help the cake rise. It reacts to create carbon dioxide bubbles, fluffing up the batter and enhancing the red pigment of the anthocyanins in the cocoa (historically) or stabilizing the added dye.
Can I freeze Red Velvet Buttermilk Cake?
Yes, this cake freezes exceptionally well, particularly the red velvet buttermilk cake with oil version. The oil keeps the crumb moist even after freezing and thawing. I recommend wrapping individual unfrosted layers tightly in plastic wrap, followed by a layer of aluminum foil. They can be stored in the freezer for up to three months without compromising quality.
Conclusion
Mastering the Red Velvet Buttermilk Cake is a rewarding endeavor that bridges the gap between historical culinary traditions and modern taste preferences. Whether you opt for a red velvet buttermilk cake with cream cheese frosting or the traditional Ermine icing, the result is a dessert that is visually stunning and texturally superior.
I encourage you to move beyond the red velvet cake mix and experience the satisfaction of creating this masterpiece from scratch. The vibrant color, the tender, velvety crumb, and the sophisticated balance of flavors make it a timeless classic worth perfecting for your next celebration.